Saving the Current View
While working with simulations and maps, it may be desirable to capture screen shots of them for use in presentations or on web pages, etc. This can be done at any time by manually saving the current view. This can also be set to happen automatically (please see Adding a Snapshot Event in Screen Camera Track Events).
To save the current view:
- Ensure the simulation currently displays the view to be saved.
- Right-click in the workspace and select Save Current View or select File > Save Current View.
- Select a folder location and type a name for the file.
- Select BMP Files, JPEG Files or PNB Files in the Save as Type field.
- Click the Save button.
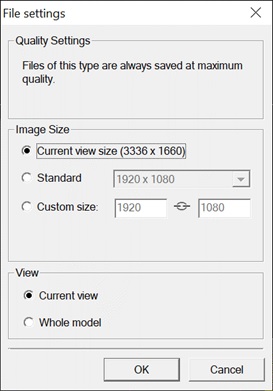
- A File Settings dialog
appears. Use this dialog to configure the size and coverage of the saved image.
- Quality settings depend on the file type chosen in the Save As dialog. They only apply to the JPEG type.
- In the Image Size section, choose from the actual size of the current view, one of the standard output sizes, or a custom size.
- In the View section, select the model coverage to save. Choose from the current view, or the whole model.
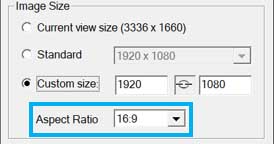
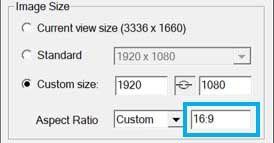
- If using a custom size,
aspect controls are visible in the dialog:
- Select an aspect ratio option from the Image Aspect Ratio drop-down.
- To enter an aspect ratio that’s not listed, select the Custom option.
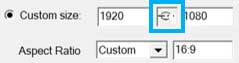
- Sizes and aspect ratio
can be "linked" when using a custom aspect ratio.
- When the sizes and aspect ratio are linked, changing one dimension automatically updates the other dimension such that the aspect ratio is always respected.
- When the sizes and aspect ratio is are unlinked, they are independent and changing a dimension automatically updates the custom aspect ratio. The other image dimension is not changed.
- To link or unlink sizes and aspect ratio, click the button between the X and Y size boxes:
- o The icon or button here indicates whether sizes and aspect-ratio are linked:
- Set the preferred image size, remembering the above rules about linked/unlinked aspect ratios.
- Click on OK to save the
current view using the selected options.
Note: Default sizes and format are declared in the Cameras, Images, Videos and Maps tab of the Simulator Project Settings dialog. See the Camera, Image, Video and Map Defaults topic for details.

 this icon (not a button) means
sizes are linked to the aspect ratio and cannot be unlinked.
this icon (not a button) means
sizes are linked to the aspect ratio and cannot be unlinked.
 this button means sizes and
aspect ratio are linked, but they can be unlinked.
this button means sizes and
aspect ratio are linked, but they can be unlinked.
 this button means sizes and
aspect ratio are not linked, but they can be linked.
this button means sizes and
aspect ratio are not linked, but they can be linked.